Tag Archive: vegetarianism


Soup!

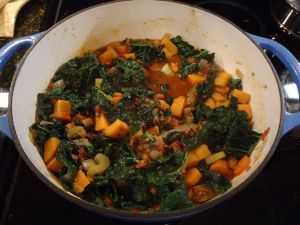
A new soup recipe to start your February off right!  It’s a good day for soup today–as I write this it is a whopping -5 degrees outside with a windchill of -24 F.  Yeah, that’s right: -24.  But this hearty and spicy soup will warm you right up, and as an added bonus, it’s healthy too!

I actually didn’t originally intend for this soup to be a blog recipe–I came across Smitten Kitchen’s soup with lentils, sausage, chard and garlic while making my grocery list for the week, and had every intention of making it exactly according to the recipe.  Since our household’s resident vegetarian was going to be out for the night, I was excited at the prospect of trying my hand at a recipe using meat.  I figured I’d just make two pots, one with Italian sausage and one without so that my husband could share in the leftovers.

When I got to the grocery store, I discovered that sweet potatoes were on sale.  I like sweet potatoes, and I figured they’d go well with the Italian sausage, so I picked some up.  Then I went looking for the sausage itself.  The recipe called for sweet Italian sausage, which I found, but in my opinion Italian sausage should always be spicy.  Alas, spicy Italian sausage was nowhere to be seen.  Of course, I could just add my own spices after the fact, but I decided that if I was going to spice it myself anyways, I should buy something healthier.  That was when I saw the package of ground chuck.  It was three quarters of a pound–just the right amount given that I’d be the only one eating it.  Perfect.

At this point I was still intending to follow the recipe (just with the meat substitution and the addition of sweet potatoes), but I kept thinking about how big of a nuisance it would be to make two separate pots of soup (and how I didn’t really have two appropriately sized/shaped pots to do this), when finally the idea of doing meatballs popped into my brain.  I could make spicy meatballs to put in the bottom of my bowl with the soup, leaving the leftover soup untainted by meat so that my husband could share in it later!

So then I had to figure out how to make meatballs.  Because I’d never done it before.  (Yeah, yeah, I know–I write a cooking blog and I’ve never even made meatballs.  I’ve never made a steak either.)  But how hard could it be?  I figured I needed meat, breadcrumbs, and egg plus some spices, but I decided to consult Google just to be sure I wasn’t missing anything.

As it turns out, most meatball recipes call for fresh breadcrumbs.  From white bread.  With the crusts cut off.  Well, I didn’t actually have any white bread, crusts or no.  I had a jar of panko breadcrumbs.  And since it was freezing cold out, my car was covered in snow, and its door likely frozen shut, I decided to just go with it.

Panko!

In the end, panko worked just fine and the meatballs turned out to be juicy and flavorful.

Balls

Simmering meatballs

Since I decided to make meatballs, the soup was no longer going to have any contact with the meat, and thus was not going to get any of the flavors of it.  So I needed to up the spice content.  I decided to use the same spices I used in the meatballs (fennel seeds, smoked paprika, red pepper flakes, garlic powder, salt, and pepper) along with a star anise.  I also put this same combination of spices into the sauce for the meatballs.

cooking the veg

In the end, this turned out to be a ridiculous amount of soup.  Unless I freeze some, I’m not going to have to grocery shop or cook for a week.  Which may be a good thing as I look at the weather forecast…

Sweet Potato Lentil Soup (with meatballs)
(serves 6)

Soup:

  • 3 tbsp grapeseed oil
  • 1/2 tbsp fennel seed
  • 1 whole star anise
  • 2 ribs of celery, sliced or diced
  • 2 large carrots, sliced or diced
  • 1 medium onion, diced
  • 2 medium or 3 small sweet potatoes, chopped into 3/4″ cubes
  • 1 tsp garlic powder
  • 1/2 tsp smoked paprika
  • scant 1/2 tbsp red pepper flakes
  • 1/4 tsp salt
  • a few grinds of pepper
  • 1 large bay leaf
  • 1 cup dry black lentils, picked over and rinsed
  • 1 can (14oz) crushed tomatoes (fire roasted if you can find them)
  • 3.5 cups water
  • 1 large bunch of kale, roughly chopped

Meatballs:

  • 1lb ground chuck (I used a bit less, but I thought the meatballs could have been a bit meatier)
  • 1 cup panko breadcrumbs
  • 1 large egg, lightly beaten
  • 1/3 cup freshly grated Parmesan cheese
  • 1/2 tsp garlic powder
  • 1/4 tsp black pepper
  • 1/4 tsp smoked paprika
  • 1 tsp fennel seeds
  • 1/4 tsp red pepper flakes
  • a small pinch of salt
  • grapeseed oil for frying

Sauce:

  • 1 can (14oz) crushed tomatoes (again, fire roasted if possible)
  • a small pinch of salt
  • a small pinch of smoked paprika
  • a few grinds of black pepper
  • a small pinch of red pepper flakes
  • a small pinch of garlic powder
  • 1 bay leaf
  • 1 whole star anise
  • a splash of water–just enough to thin it out

Heat the 3 tbsp of grapeseed oil in a large pot or dutch oven over medium heat.  Add the fennel seeds and star anise for the soup, and stir them around for a minute or two until they start to get fragrant.  Add the celery, onion, carrots, sweet potato, and all of the spices except for the bay leaf.  Cook the vegetables for a few minutes until the onions start to get translucent.  Then add the water, tomatoes, lentils, and bay leaf.  Stir, and then cover and simmer for 20 minutes.

After 20 minutes have passed, check on your soup, give it a stir, and then cover it and set a timer for another 20 minutes.  Combine the sauce ingredients in a pyrex measuring cup or other dish that pours easily.  Set aside.  Meanwhile in a large metal bowl, mix together your breadcrumbs, spices, and the Parmesan cheese for the meatballs.  Then add the ground chuck and beaten egg, and mix it with your hands until it’s just uniformly combined.  Yes, you should really use your hands, and be careful not to overmix (you don’t want the meatballs to be tough!)  Form the mixture into balls, about an inch and a quarter in diameter.  I ended up with 18 of them.

Add just enough grapeseed oil to just coat the bottom of a saute pan over medium high heat.  When the pan is hot (you can test this by gently setting one of your meatballs in it–if it sizzles, it’s hot enough), add all of your meatballs in a single layer, and use a pair of tongs to turn them occasionally until they’re browned on all sides.  How do you know when it’s time to turn them?  When they stop sticking to the bottom of the pan.  Seriously, don’t worry if they stick at first–they’ll come unstuck.  Once they’re browned on all sides, you can take the pan off the heat and skim out a bit of the excess oil if it seems like there’s a lot (do this quickly–you don’t want the pan to cool!), and then deglaze the pan with your tomato sauce mixture.  Be careful–it splashes.  Reduce the heat to low, and cover the pan.  Simmer for 10 minutes to cook the meatballs through.

Meanwhile, your soup timer has probably gone off.  Give the soup a taste, and check if the lentils are done.  If they’re not, keep the soup simmering.  Adjust seasonings as necessary, and then when the lentils are done, turn the soup down to low to keep it warm until the meatballs are ready.

Check the internal temperature of the meatballs–you want to see at least 165 degrees.  Make sure you check meatballs both in the middle of the pan and on the edges–mine cooked much faster on the edges of the pan than in the middle, so I ended up moving them around partway through.

Once the meatballs are done, put three of them in the bottom of a bowl, cover it with soup, and enjoy!

Did you know it’s possible to make tofu that doesn’t taste like feet?  No?  Neither did I!

But it IS possible.  And the results are delicious!  All you need to do is watch some Good Eats and buy a lime.  (Well, and some other stuff…more on that in a bit.)

You might be asking yourself why, precisely, I was cooking tofu the other day when I was firmly of the opinion that it tastes like feet and that there are far better ways to get protein (nuts, dairy, eggs, or for us non-vegetarians, meat).  Well, the answer is that my vegetarian husband picked up a package of tofu at the grocery store and wanted us to try and make it like some of the “good” restaurant tofu that’s out there.  And tofu *is* actually quite healthy.

Now I will admit that there are varying degrees of tofu awfulness, and that I have, on occasion (usually in Asian restaurants), had tofu that bordered on being edible.  But I had never yet found tofu that I actually wanted to eat (unless I were starving on a desert island somewhere.)  However, I do like a challenge in the kitchen, and I did want to find a way to add more calories/protein to my typical stir fry recipes so that we wouldn’t negate the healthiness of all the vegetables by gorging ourselves on gelato afterwards.  So I needed some help.  I turned to Alton Brown, who is pretty much always the best source of information on how to cook an unfamiliar ingredient.  Or a familiar one for that matter.

I remembered having watched the tofu episode of Good Eats, and since we never delete Good Eats off the dvr, it was a simple matter of endless scrolling to find it.  What I was looking for was this recipe: thick slices of firm tofu, marinated, battered with egg and fried.  I decided, however, to make my own marinade, since I intended for this tofu to go with Asian-style stir fried vegetables.  While the tofu slices were being squished to remove excess moisture and render them ready to soak up my marinade, I took stock of my pantry options.

Tamari soy sauce of course would be a key ingredient for the marinade.  Mirin and rice vinegar also seemed like good options to get a bit of acidity in there.  Sriracha of course would bring the heat, ginger and lemongrass would add another nice flavor dimension, and then I remembered!  I had a sad, lonely lime sitting in the fridge, left over from making the curry paste.  It was a bit ugly on the outside, having given up its zest to the curry, but the inside was still bright and fresh, and full of juice!  This, in the end, turned out to be the key marinade ingredient, and the main one that I was able to taste in the finished product.

Tofu taking a marinade bath

After the tofu had soaked in its marinade bath for half an hour (15 minutes per side), it was time to fry it.

Now I am notoriously bad at pan frying.  Either my oil isn’t hot enough and things get limp and greasy, or it’s too hot and it smokes, or the things that I’m frying fall apart (looking at you, potato pancakes!), or things get all squished and deformed when I’m trying to flip them…

But this time I was prepared!  With the aid of Alton Brown’s recipe, I was able to create a nice egg batter that stuck to the tofu.  I decided to go with grapeseed oil instead of canola oil for frying because grapeseed oil has a much higher smoke point–thus I would be unlikely to smoke it.  I had spring-loaded tongs at the ready for flipping the tofu, and a thermometer so that I could periodically monitor the oil temperature.

After heating up the oil, I gently placed the egg-battered tofu into the pan.  Instant sizzle – success!  I kept an eye on the temperature and after two minutes, flipped each piece–they were actually golden brown!  After another two minutes I removed them to a cooling rack over a sheet pan to drain.  They smelled good!  I assumed the pleasant smell was just the egg batter, but I was quite pleased that they came out looking like they were supposed to.

Golden fried deliciousness!

Meanwhile it was time to stir fry the vegetables.  I had already chopped them up while the tofu was marinating, and since the burner was still hot, it was a simple matter to grab another (larger) frying pan, add a little oil, and toss the veggies in.

Rainbow!

You might want to tie your lemongrass in a bundle for easy removal. Doing it this way was a mistake.

After the veggies had softened up a bit, it was time to deglaze the pan and get some flavor in there.  I had planned on just using the rest of the marinade to accomplish this, but I overestimated how much was left and underestimated how much I would need to create any sort of sauce.  So I added more tamari, mirin, and rice vinegar, along with a sizable squirt (okay, several sizable squirts) of sriracha, and more grated ginger.  I also added the broccoli and finely sliced Thai chiles at this point, because I didn’t want them to overcook.  I covered it with a lid that is rather too small for the skillet, but it was good enough to collect some steam to cook the broccoli faster.  After a few more minutes, it was done!

The lid is too small!

To assemble the dish, I started with a nice scoop of brown rice (which I had cooked with a bit of tamari and lemongrass, and which, miracle of miracles, did NOT boil over!), and then topped it with a healthy scoop of vegetables, and then put the lovely golden tofu brick on top and spooned a bit of sauce over the whole thing:

Isn't it pretty?

Pretty, aren’t they?

And then it was time to taste it.  I cut off a corner of the tofu, admiring the crispy egg crust, and popped it in my mouth.  And was shocked!  It tasted good!  Not just in an I-can-see-how-this-would-be-good-if-you-liked-this-sort-of-thing way, but in a legitimately I-want-seconds kind of way!  It was delicious!  There was no trace of the soy flavor I typically find so unpleasant.  Just crispy egg batter, a pleasant tang from the lime, and a soft texture somewhat akin to a fluffy quiche.  No longer could I say that I hated tofu.  Hats off to Alton Brown.  His tofu-cooking technique is without equal.

Asian-Style Vegetable Stir Fry with Delicious Tofu
(serves 4)

For the marinade:

  • 2tbsp tamari soy sauce
  • 1tbsp mirin
  • 1tbsp rice vinegar
  • the juice of one lime
  • several squirts of sriracha
  • a pinch of freshly grated ginger
  • 1 stalk lemongrass halved and separated

For the tofu:

  • 1 15oz block extra firm tofu
  • 1/3c all purpose flour
  • 2 large eggs
  • grapeseed oil

For the vegetables:

  • 1-2 tbsp grapeseed oil
  • 2 large carrots, sliced into rounds
  • 1 large or 2 small heads of broccoli
  • 2 watermelon radishes (optional)
  • 1 medium onion, roughly diced
  • 2 cloves of garlic, smashed and minced
  • 7-8 stalks of lemongrass, halved and tied in a bundle
  • 1-inch knob of ginger, grated
  • 2 green Thai chiles, finely minced
  • the leftover marinade
  • additional mirin, rice vinegar, and tamari in equal parts
  • sriracha (to taste)

For the rice:

  • 1c brown rice
  • just over 2c water
  • splash of tamari
  • 1 stalk lemongrass, halved and separated

Drain the liquid from your package of tofu, and then slice it and press the rest of the liquid out as per Alton Brown’s recipe.  A few minutes before it’s done, get out a container with a tight-fitting lid that’s big enough to fit the slices of tofu side by side.  Add in the tamari, mirin, rice vinegar, sriracha, lime juice, ginger and lemongrass and stir until the sriracha is fully dissolved.  Taste it, and add more sriracha.  (Don’t worry–you can add a whole lot and your tofu still won’t be spicy.)  When the tofu is ready, put it in the marinade, cover it up, and set aside for half an hour.  If the tofu isn’t fully submerged, flip it halfway through.

Meanwhile, wash and chop up all your veggies.  Be sure to mince the Thai chiles very finely because they pack some punch!  This is also a good time to get your rice started, since it will take a good half hour (more if you’re using wild rice) to cook.

If you happen to have two good skillets (and two good burners), you can fry the tofu and stir fry the vegetables at the same time.  The vegetables don’t take a whole lot of attention, and the tofu isn’t hard to fry.  But if you want to do them one at a time like I did, start with the tofu.  I followed Alton Brown’s instructions pretty much exactly, right down to the spring-loaded metal tongs.  The only change I made was to use grapeseed oil instead of canola oil.  This is not strictly necessary, but if you do use canola oil, keep a closer eye on the temperature.  Grapeseed oil is good to 420 degrees.  Canola oil varies significantly depending on how it’s processed, but the kind I have is only good to 375-400 degrees.  And I have made it smoke before.  Grapeseed oil seemed safer.  When your tofu is done, remove it to a wire rack over a sheet pan to drain off any excess oil.

For the vegetables, heat a little oil in your skillet and add everything except the broccoli and Thai chiles.  Toss/stir them around occasionally.  Once your vegetables have started to soften, deglaze the pan with the extra marinade plus equal parts additional tamari, mirin, and rice vinegar as well as some sriracha.  You want just enough to create some sauce in the bottom of the pan.  Add in the broccoli and Thai chiles, stir, and then cover to let the broccoli steam.

By the time your vegetables are done, your rice should also be done.  Put some rice on each plate, top with vegetables and a slice of tofu, spoon a bit of sauce from the vegetable skillet over the top, and enjoy!

For dinner on Saturday night we had a reservation at Natural Selection, a tiny all-vegetarian restaurant that came highly recommended on Yelp.  Since my husband is vegetarian, and there are at least 74 vegetarian restaurants in Portland (compared to only one at home!), we had a bit of a hard time deciding where to go until we read the reviews and found Natural Selection.  We were super excited to try it out, and it definitely delivered!

The four course menu is pre-set by the chef; you simply choose Column A or Column B – we went for one of each so we could share and get to try everything.

Bright green!

Course 1A: Chilled sweet pea soup

[Course 1B: It was eaten too fast to get a picture!]

Course 2A: Melon salad with fried capers

Course 2B: Pickled radish salad with a 7-minute egg

Palate cleanser: cherry lemon granita

Course 3A: Succotash with a kale “purse” filled with rice and edamame

Course 3B: Squash gratin with carrots and potatoes

Molecular gastronomy!

Course 4A: Cherry parfait with cherry gumdrop cubes

Course 4B: Apricot bread pudding with blueberries

Everything we had was absolutely, fantastically delicious!  The crunchy garnish on the sweet pea soup played perfectly off of the flavor of the peas which can best be described as, well, green.  In an awesome way.  The 7-minute egg was perfectly cooked and its richness perfectly complemented the radishes in the salad.  The sweet melons played brilliantly off the salty capers.  And the desserts…I had the cherry parfait and I really didn’t want to share.  The tartness of the cherries, the sweetness of the cream…and the gumdrop cubes on the side!  Molecular gastronomy at its finest!  (I have always loved gumdrops…)  I know it’s hard to decide where to eat in Portland because there are so very very many delicious restaurants, but seriously, go to Natural Selection.  (Just make sure you have a reservation!)

I love chicken pot pie.  Okay, really I love all pies, but most pies are dessert–chicken pot pie is your entree!  You could have pie twice in one meal and be totally justified!  Unfortunately, chicken pot pie is, for obvious reasons, not vegetarian friendly, and when you’re married to a vegetarian, it’s usually nice to cook things that both of you can eat.

Enter the vegetable pot pie.  All the creamy goodness and golden brown flaky crust, none of the dead animals.

You can really use any vegetables you want–potatoes, parsnips, carrots, beets, onions, sweet potatoes, celery, greens…it’s all good!  Just adjust your herb selection based on your vegetables and you’re good to go.  In my case I had some beautiful golden beets, a bunch of swiss chard and a couple of potatoes so I decided to go in a dill-heavy direction (I love dill!).  But play around!  The beauty of this dish is that you can make individual pies in ramekins, so feel free to make some different flavor combos.

Confession time: I did not make my crust from scratch.  I had Trader Joe’s puff pastry in the freezer and as I was short on time, I just slapped it on top of the pie instead of taking the time to make my own crust.  That said, Trader Joe’s puff pastry is quite delicious.  So don’t feel bad if you don’t make puff pastry from scratch!  It’s a little high maintenance, what with all the folding, pounding and rotating.  (If you do want to make it from scratch though, Alton Brown will teach you how!)

The third important part of making a good pot pie is the sauce.  This is what gives the filling the delicious creaminess you expect from a pot pie.  And the key to a good sauce?  A good whisk.  Whisk the flour and melted butter together to make a smooth roux, and then just keep whisking as you add the milk and stock.  This is how you will avoid lumps.  I’m also convinced the sauce thickens faster when I’m whisking, but I make no promises.

And with that, I give you my take on a vegetable pot pie:

Vegetable Pot Pie, fresh out of the oven!

Vegetable Pot Pie
(makes approx. 5 servings of pie with some leftover filling)

  • 3 medium beets
  • 4 medium potatoes
  • 1 bunch Swiss chard
  • 1/2 large onion, diced
  • splash of olive oil
  • 3 tbsp dried dill
  • 3 tbsp unsalted butter
  • 3 tbsp all purpose flour
  • 1 cup milk
  • 1/2 cup vegetable stock
  • salt
  • pepper
  • 1 sheet puff pastry
  • 1 large egg
  • 1 tbsp water

Preheat your oven to 425 degrees.  Give your beets a good scrub and then put them in a large pot of water and bring them to a boil.  Cook them until you can get a fork into the center of the beet without too much difficulty.  Drain, run them under cold water, and slip the skins off.  Then dice them and put them in a large mixing bowl.

Meanwhile, cube the potatoes (you can peel them if you like–I didn’t bother) and bring them to a boil in a pot of salted water.  (If your beets are already done, you can use the same pan to save on dishes, but get some fresh water in case there was any grit left on the beets).  Cook until just barely tender–be careful not to overcook them!   You don’t want potato mush!  Add them to the bowl with the beets.

Dice the onion and chop up the upper half of the chard stems and put them in a skillet with a splash of olive oil over medium heat.  When the onion starts to turn translucent, add the chard leaves (cut them into bite sized pieces first) and a pinch of salt and let it cook until the chard is fully wilted.  A lid helps speed the process along if you have one that will fit your skillet.   Once that’s done, add it to the bowl with the beets and potatoes.  Add the dill as well.

In a saucepan, heat the butter over medium-low heat.  When it’s melted, add the flour and whisk until you get a smooth paste.  Then add the milk and stock, whisking as you go.  Keep whisking until the sauce starts to bubble and it thickens up.  Once it’s at a consistency that you like, take it off the heat and pour it in with the vegetables.

Toss everything together until the vegetables are well coated with sauce.  Give it a taste, and season with salt and pepper.

Take your puff pastry and lay it on a cutting board.  (If it was frozen, thaw it for 10 minutes first).  Cut it into pieces large enough to cover the tops of the ramekins with an overhang of 1/4-1/2 inch.  Or if you’re me and you’re geometrically challenged, cut a piece to fit your biggest ramekin and cover the other pies with random scraps.  And then only take a picture of the pretty one.

Set five small ramekins (or whatever odd selection of ramekins you have handy–there’s no reason you can’t make one big pot pie if you want) on a sheet pan.  You can line the pan with parchment paper for easier cleanup if you like.  Fill the ramekins with your vegetable mix.  In a small bowl, beat together the egg and tablespoon of water.  Brush it onto both sides of the puff pastry, and set the pastry over the tops of the filled ramekins.  Put it all in the oven and bake for 15 minutes.  After that, check it every few minutes until the pastry is puffed and golden brown and the filling is bubbling.  Let the pies rest for a few minutes after you take them out of the oven.

Enjoy!

It’s been too long since I last posted.  My time has been consumed with far too many books and not nearly enough cooking.  But at last I have survived my general exams and have time to get back in the kitchen!

I have a couple new recipes to write about, but I decided that this one needed to come first so that I wouldn’t forget what I put in it!  It was very much a make-it-up-as-you-go-along type of dish.  I bought the kale and mushrooms knowing that I wanted to put them with white beans, but aside from that I had no idea where I was going to go with this!

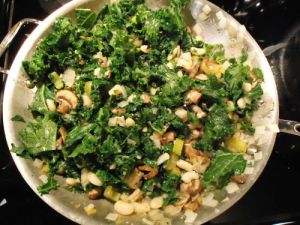
mushrooms, celery and onion

I ended up going in a garlicky, nutmeggy, peppery direction–because there was so much kale, the spices didn’t always get evenly mixed in, leading to bursts of different flavors in different bites.  If you want a more uniform flavor, it would probably be best to add all the spices prior to adding the kale to the skillet.

Speaking of the kale, you could really substitute any leafy green you like in this recipe–swiss chard, beet greens, lacinta kale or red kale would all work well.  Another addition that might be nice is bacon–if you fried the bacon in the same skillet with everything else, you could omit the butter and just use the bacon grease.  Bacon makes everything better, and gets along well with both beans and kale, but alas, it’s obviously not vegetarian-friendly.  If you do make this with bacon, though, let me know how it goes!

the finished dish

Mushroom, Kale and White Bean Skillet
(serves 4)

  • 4 big handfuls dried white beans (or 1 can)
  • 1 large bunch of kale (or other greens), roughly chopped
  • 12-15 crimini mushrooms, sliced
  • 1/2 large onion, diced
  • 3 stalks of celery, chopped
  • olive oil
  • 2tbsp butter
  • splash of white wine
  • 1 bay leaf
  •  thyme
  • oregano
  • garlic flakes
  • nutmeg
  • 1-2 pinches salt
  • freshly ground black pepper
  • crushed red pepper flakes
  • freshly grated Parmesan cheese

Soak your beans overnight, or at least for an hour or two prior to cooking.  (If using canned beans, simply rinse them off and skip the next few steps.)  Rinse off your soaked beans in cold water, and then put them in a medium-sized pan with enough cold water to cover them by at least half an inch to an inch.  Bring the beans to a boil, and then reduce the heat and simmer them until tender.  Keep an eye on them so they don’t boil over!

When your beans are almost done, put your largest skillet on to heat up over medium heat.  Once it’s hot, add a glug or two of olive oil, and then add the onion and celery.  When the onion is transparent, add a good splash of white wine, the bay leaf, thyme, oregano, and garlic flakes.  (This is not an exact science–just put in a good shake of each).  Stir everything around, and let the wine cook off.

While that’s going, slice up your mushrooms, and when the wine is almost gone, add the mushrooms to the skillet.  While those are going, you can wash and chop the kale.  Once the mushrooms have started to brown, drain off any water that was still in with your beans and add them to the skillet.  (Or add your canned and rinsed beans).  Add the nutmeg, salt, pepper, and red pepper flakes, as well as the butter.  Once the butter is melted, add the kale.  It will seem like a lot of kale, but it will lose a lot of volume as it cooks down.

Once your kale is cooked down, make sure everything is mixed thoroughly and taste your dish.  Adjust the seasonings according to taste, take it off the heat, and top it with freshly grated Parmesan cheese.  Enjoy!

The Year of the Vegetable!

Check out this article on Salon about how cooking vegetables is the hot new trend of 2011. Which sounds kinda dumb, except look around–vegetables so rarely feature as the main part of a dish in a restaurant! And it’s so hard to find good vegetarian meals. (I’m not even vegetarian, not that you’d know it by my cooking) It’s always about the meat. But it doesn’t have to be!