Category: Garlic


Spring has sprung!

Spring is late this year–there’s even still some snow on the ground in the shady areas. (That’s the last time I ever trust a groundhog to predict the weather!)  But a few glimmers of hope are finally starting to shine through.  Tulips are trying to come up, birds are building a nest out on our balcony, and asparagus that was not grown in Mexico has reappeared in the grocery store.

I bought some, not quite sure what I intended to do with it, but I knew that I wanted to leave it raw or nearly so.  Further inspiration struck in the form of a lovely brick of cheese at Trader Joe’s – it was a mix of cheddar and gruyere: a perfect combination of flavor and melt-ability!

I decided to make a pasta dish with a basic white sauce as its base that would really show off the freshness of the asparagus.  At the last minute, I also decided to throw in a handful of fresh green beans, but you could totally use frozen as long as you thawed them out first. Peas would be another excellent and springlike addition.  Just go with whatever looks good!

The key for the asparagus, though, is tossing it in to the sauce at the end, just before you add the pasta–you want it to heat through, but you don’t want it to lose any of its delightful, crisp freshness.  So don’t overcook it!

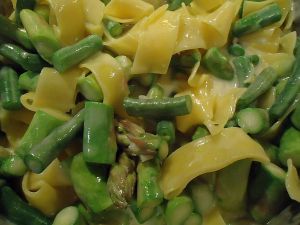
Ready to eat!

Springtime Asparagus Pasta
(Serves 2-3)

  • 1 bunch asparagus, chopped into 1 inch pieces
  • 1 handful green beans, chopped into 1 inch pieces.  Feel free to use frozen, but thaw them before adding to the dish.
  • 2 cloves garlic, finely minced
  • 2 tbsp butter
  • 2 tbsp all purpose flour
  • 1 c milk
  • 1/2 c grated cheese (I used a cheddar-gruyere blend)
  • 112g pasta (I used papardelle)
  • salt
  • pepper
  • pancetta (optional)

Put a pot of salted water on to boil.  Cook the pasta to al dente and drain.  While the pasta is cooking, melt the butter in a saucepan over medium heat.  Once it’s melted, whisk in the flour.  When the roux is smooth, pour in the milk, whisking steadily to combine.  Add the garlic, and keep whisking until the sauce begins to thicken.  If it starts to bubble, reduce the heat.  Add in the cheese, and once it’s melted, add in the asparagus and green beans.  Toss in the pasta, and mix to combine.  Season with salt and pepper, and, if you like, top it with some crispy pancetta bits.  Enjoy!

Egg Kulambu

Looking for something to do with those leftover hardboiled eggs you have laying around after Easter?  Try this awesome South Indian recipe I stumbled across–it only requires an onion, a tomato, a can of tomato sauce, some garlic, and a variety of pretty standard Indian spices.  It’s called Egg Kulambu, and it filled my kitchen with the most delightful smells as it simmered away on the stove.  I used roughly twice as much tomato sauce as the recipe called for (and reduced the amount of water accordingly) because I didn’t want half a can of tomato sauce sitting around.  I actually like the way it made the sauce a bit thicker.  This dish would be excellent served over rice or with some naan, although I actually ended up eating it like soup with some toast on the side.

Be forewarned – this dish does pack a powerful punch, so if you’re sensitive to spicy foods, you may want to cut back on the cayenne a bit. But if you, like me, have been searching for a South Indian recipe that doesn’t hold back on the spices, go for it!

But you may want to have a glass of milk handy, just in case.

That's cilantro on top.  Fresh would be better if you have it...

Egg Kulambu by Alamelu Vairavan

P.S. A note about hard boiling eggs: I usually use this method from Simply Recipes, and I’ve never overcooked my eggs with it.  But I still spend the whole time standing over the pot, worrying if they’re going to come out right.  If anyone has any foolproof tips, leave them in the comments!

Saying that this dish did not turn out right the first time would be an understatement.  I’ve made plenty of dishes over the years that haven’t turned out quite like I had envisioned or that could use some tweaking here or there.  My first attempt at this one though?  Was nearly inedible.  My husband bravely finished his bowl and told me it wasn’t that bad, but really?  It was that bad.

So why am I sharing a recipe with you that I fully admit started off as inedible?  Because I ended up making it again the other night, with some MAJOR modifications and it turned out to be a pretty tasty dish!

The problem with the original version and thus the key to making the new version tasty?  Garlic.

When I pureed the pesto in the blender the first time around, I added in raw garlic (not a lot, I swear!) thinking that it would be a good punch of garlicky flavor (and be mellowed out by the cheese, broccoli, etc).  Well, this might have worked if it had been green garlic, or even early summer garlic.  But late winter garlic?  Not so much.  One of my friends coined the term “death garlic” and that pretty much sums it up.  It completely overpowered everything else in the dish and filled your tongue with a noxious, garlicky burning sensation.

The solution?  Roasting.

mmm...garlicky!

For the new version of this dish, I set half a head of garlic on a piece of aluminum foil, drizzled it with olive oil, sealed it up, and roasted it at 350 degrees for 35 minutes.  Problem solved!  The smell of roasted garlic is absolutely amazing, and it mellows out the flavor to the point where you almost want to just sit there eating it with a fork.  Plus roasting makes the cloves pop right out of the papery skins!

I made a few other changes to the original recipe as well.  This time I made the pesto in the food processor instead of the blender (it made drizzling in the olive oil much easier), I added Parmesan cheese to the pesto instead of the goat cheese I used in the original version (kept the pesto thinner), and because I had them, I sauteed some mushrooms and shallots and tossed them in with the broccoli.  The mushrooms turned out to make a big difference–they added a texture and savory depth that was missing from the first version of the dish.

Pesto at the end of the tunnel


mushrooms!


So much pesto...

One note on the type of pasta: I used whole wheat fusilli noodles (corkscrew shaped), which worked out really well because this is a rather thick pesto.  There are plenty of other shapes that would work too–I’d just recommend staying away from long and/or flat pastas like papardelle or fettuccini.  They won’t work nearly as well.

In the end, the new version of this dish was MUCH tastier than the original, still not very difficult to make, and something that’s definitely worth adding to your pasta and pesto repertoire.

Ready for eating!

Broccoli Pesto Pasta
(serves 2-3)

  • 1/2 head of garlic, outer layers of skin removed
  • 3 medium crowns of broccoli, long stems are a bonus
  • 1 cup of mushrooms, sliced
  • 2 shallots, diced
  • 1/3 cup freshly grated Parmesan cheese
  • olive oil
  • 112g whole wheat pasta
  • salt
  • pepper
  • lemon juice (optional)

Preheat your oven to 350 degrees.  Remove the outer layers of papery skin from the head of garlic.  You only need half the cloves for this recipe, but feel free to roast the whole head of garlic if you have another use for it.  Set the garlic on a piece of aluminum foil and drizzle it thoroughly with olive oil.  Seal it up, put it on a cookie sheet, and roast for 35 minutes.

Meanwhile, bring a pot of well salted water to a boil.  When it’s boiling, dip the crowns of broccoli in, one at a time, for 30 seconds each.  (This is why the long stems are helpful–they give you something to hold on to.  If your broccoli doesn’t have a long stem, just drop it in and fish it out with a slotted spoon after 30 seconds).  As soon as you take the broccoli out of the boiling water, run it under cold water for a bit to stop the cooking.

Roughly chop two of the three crowns of broccoli and put them in the food processor.  Grate in about 1/3 cup of Parmesan cheese (more or less as you desire), and add a few grinds of black pepper.  Take your garlic out of the oven, carefully open up the foil pack, and remove the cloves of garlic from their skins and add them to the food processor.  Pulse several times, scrape down the sides, and then let it run as you drizzle in olive oil.  You want enough olive oil to thin it out into a sauce-like consistency rather than a paste, but not so much that it tastes oily.  Stop and taste it periodically until you get the consistency you prefer.  Salt to taste.

Once the pesto is done, add the pasta to the pot of (still boiling!) water that you cooked the broccoli in.  While that’s cooking, heat a bit of olive oil in a medium sized skillet and add the shallots and mushrooms.  Cook for a few minutes until the mushrooms are nice and brown.  Chop the remaining broccoli into bite sized florets and add it to the skillet.  Drain the pasta, and then add both it and the pesto to the skillet and toss everything together.  Once everything is well coated in pesto, take it off the heat and serve garnished with a bit more freshly grated Parmesan and/or a squeeze of lemon juice.  Enjoy!

Hi, everyone!  I am FINALLY back on my blog after several months of radio silence.  I’ve been away on campus teaching for the semester, and while I had originally intended to continue posting, there’s not much to say when your primary instrument of cooking is a microwave.  (If you were wondering, it is possible to successfully make pasta, beets, potatoes, and a variety of other things in the microwave.  But after a while you get lazy and just buy a lot of boxes of soup.)  I am super excited to get back to blogging, and I have some awesome recipes coming up including a butternut squash dish, a cake, a salad, at least one type of cookie, and, the subject of today’s post: mushroom barley soup!

I’m a big fan of barley.  It is both absurdly healthy and absurdly versatile–you can make it into a breakfast cereal, put it in soups, make it into a risotto, use it as the base of a dish like you would rice or couscous…

Except.

It takes forever to cook.

Oh, the pearled kind cooks up in a perfectly reasonable amount of time, it’s true.  But pearled barley doesn’t have nearly the nutritional punch that hulled has, plus it doesn’t have quite the same pleasing, chewy texture.

Solution:  slow cooker. With a minimal amount of planning ahead, I pre-cooked the barley overnight in the slow cooker, so that when it came time to make the soup, all I had to do was throw it in.  And it’s so easy to make barley in the slow cooker, you can do it while you’re sleeping.  Literally.  If you cook it on low, it’s ready in 6-8 hours max, which means that this is also an excellent way to replace your breakfast oatmeal with breakfast barley.  And in fact, I ended up with more cooked barley than I needed for the soup, so I had ready-made breakfast for the rest of the week!

The soup itself was something I came up with while falling asleep one night–it just popped into my head like a dream and practically wrote itself–when I made the soup a few days later, I felt like I was following a recipe, even though I was making it up.  It’s a good soup for a cold winter day–the hearty barley and beans along with the rich mushroom flavor and just a touch of sour cream warms you through without being heavy, and the topping of freshly grated Parmesan adds the perfect amount of umami.  (It would be a good thing to enjoy with a nice thick slab of oat soda bread from 101 Cookbooks.)

So here it is, just in time for Christmas:

Mushroom Barley Soup
(Serves 9)

For the barley

  • 1 cup dry hulled barley
  • 4.5 cups water

For the soup

  • 1/4 cup dried porcini mushrooms
  • 3/4 cup hot (not quite boiling) water
  • 2 tbsp butter
  • 1 medium onion, diced
  • 1 head of garlic, peeled, smashed, and roughly chopped
  • 3-4 cups sliced raw mushrooms (I used a mixture of crimini and white button)
  • 1/2 cup dry white wine
  • 4 cups mushroom broth
  • 1 can of navy beans, drained
  • half to all of the cooked barley
  • 1 large bunch of kale, chopped into bite-sized pieces
  • 1/3 cup sour cream
  • salt
  • pepper
  • Parmesan cheese (for topping)

The night before you plan on making the soup, get out your slow cooker and put in one cup of dried, hulled barley and 4.5 cups of water.  Give it a stir (and pick out any bits of chaff that may have been in with your barley), cover it, and set it to low for 8 hours.  In the morning, scoop it out, put it in a container, and pop it in the fridge until you’re ready to make the soup.

When you’re ready to make your soup, take your dried porcini mushrooms, put them in a small bowl, and cover them with hot water.  Let them steep while you get everything else going.  The water should turn a rich shade of reddish-brown, and the mushrooms will re-hydrate.

Meanwhile, in a large stock pot or dutch oven, melt two tablespoons of butter over medium-high heat.  When the butter is melted and the pan is hot, add in the diced onion and garlic, and saute until the onion starts to get transparent.  Then add the sliced mushrooms, and continue to stir occasionally until the mushrooms start to darken.  Deglaze the pan with the white wine, and let it simmer until most of the wine has cooked off.

Chop up the re-hydrated porcini mushrooms and add them to the pan, and strain in the liquid they were soaking in.  Add the mushroom broth, beans, and as much of the barley as you would like in your soup (more if you want your soup thicker like a stew, less if you want it more soup-like), and the kale.  Cover, and simmer until the kale has completely wilted.

Stir in the sour cream, and then add salt and pepper to taste.  It will probably take more salt than you think you need; just add it a little at a time.

Ladle it into bowls, top with Parmesan cheese, and enjoy!

Mushroom Barley Soup!

I love my slow cooker.  It’s so nice to be able to just put the ingredients in it in the morning and have dinner ready and waiting for us when we get home.  And at 3.5 quarts, it’s plenty big enough to feed the two of us with enough leftovers for several lunches, and it’s also a great way to feed a crowd.  But when most people think about slow cookers, they think about things like meaty stews or pot roasts–obviously not going to fly around here!  However, slow cookers are also great for cooking beans.  And lentils, and chickpeas, and black eyed peas, and just about anything that you normally have to soak overnight and then boil for an hour.  Conveniently, these are all things that form the basis of a lot of Indian dishes, and so that’s what usually gets made in our slow cooker!

If you’re new to cooking Indian food (or even just to slow cooking it), I would highly recommend this book: The Indian Slow Cooker. So far all the recipes I’ve made from it have been delicious, plus it helps you get used to the cooking times required for different ingredients so that you can create your own recipes (which is what I’ve done here.)

So on to the evolution of this fusion curry.  I’ve been wanting to make my own curry paste for a while, and as I had a whole bunch of long green chiles from the farmer’s market, I decided now would be a good time to do it.  After a bit of googling, I discovered that the key ingredients for green curry paste are green chiles, lemongrass, kaffir lime zest, shallots, garlic, cilantro, coriander seeds, cumin seeds, salt, shrimp paste, and galangal.  Now for obvious (vegetarian husband) reasons, shrimp paste was out, but I figured that its primary contribution was salt, so if the paste tasted bland, I could always just add soy sauce (or more salt!).  Galangal was a bit more of a problem–I had nowhere to get it.  The Asian grocery store might have had it, and there are probably places in the city that sell it, but I was not about to go on a wild goose chase all over town.  So I decided to substitute ginger.  Yes, I know, it’s not authentic, but ginger tastes good, is readily available (I always keep some on hand in the freezer), and goes with all the other flavors.  So ginger it was!

The beginnings of curry paste

I ended up with rather a lot of curry paste.  Several cups of it in fact.  The first day I made it, I made a coconut curry on the stove with Thai eggplant, broccoli, kale, and soba noodles.  It…wasn’t that good.  I had tried simmering the vegetables in the coconut milk and curry paste but by the time the vegetables were reasonably cooked through, the coconut milk had reduced way past what I had wanted, and to be perfectly honest, I just don’t like eggplant very much anyways.

That's a lot of curry paste!

So the next day I decided to try again, this time in the slow cooker.  Using a little inspiration from the cookbook’s black-eyed peas recipe, I decided to go with a combination of chickpeas, black chickpeas (which are slightly smaller than the regular ones) and black-eyed peas.  If you’re making your own version, feel free to use whatever combination of dried beans you like.  After giving them a good rinse, I put them in the slow cooker along with four and a half cups of water and all of the leftover curry paste, plus some turmeric and a bit of brown sugar to provide a sweet note to counter the spice.  And then I just let it cook.  I set the timer for eight hours, and about ten minutes before the end I added a can of coconut milk and some vegetables–broccoli and green pepper.  I did end up adding an extra half hour to the cook time because the vegetables weren’t fully submerged so they didn’t cook as quickly as I had expected.  The end result?  Much better than making it on the stove and definitely delicious!

Fusion Curry

Thai-Indian Fusion Curry
(serves 6-8)

For the Curry Paste:

  • 5-10 peppercorns
  • 1tbsp coriander seeds
  • 1tsp cumin seeds
  • 1 large onion (or 2-3 shallots), roughly chopped
  • 1 small head of garlic (8-10 cloves), peeled and smashed
  • 7-10 stalks lemongrass, chopped
  • a 2-inch knob of ginger, peeled and chopped
  • 15 spicy green chiles (mine were about 6″ long. use more if you’re using the small thai chiles), de-seeded and chopped
  • a small handful of fresh cilantro, chopped
  • the zest of one lime
  • 1/2tsp kosher salt

Everything else:

  • 1.5c dried chickpeas, black-eyed peas or beans in any combination, rinsed in cold water
  • 4.5c water
  • 1tsp turmeric
  • 1tbsp brown sugar
  • 13.5oz coconut milk (1 can)
  • 1 large head of broccoli, chopped (you can use the stems too!  just peel them first)
  • 1 green pepper, chopped

Toast the coriander seeds and cumin seeds in a dry pan over medium heat for a few minutes until fragrant.  Keep them moving in the pan so they don’t burn.  Then put them in a spice grinder with the peppercorns and grind them up.  Set the mixture aside.

Put the chiles, onion, garlic, ginger, lemongrass, cilantro, lime zest, and salt into a food processor* and buzz it up until you have a relatively uniform consistency.  Taste it, and adjust the ingredients if you need to.  (Be sure to have a glass of milk on hand to quell the burning afterwards!)  Add the ground up spices, and run the food processor a bit longer until everything is fully incorporated.  Set aside.

Measure out your chickpeas and/or other beans and give them a good rinse.  Check for very small rocks (which, despite what you may have heard, do not float!).  Put them in into the slow cooker and add 4.5c of water.  Add 1-2 cups of your fresh curry paste (depending on how spicy you want your curry to be), the turmeric, and the brown sugar.  Mix everything up, cover it, and set your slow cooker to high for 9 hours.  Go about your day.

After 8 hours, the beans/chickpeas should be fully cooked.  Give everything a good stir, and then add the coconut milk and vegetables.  Stir again, cover it back up, and let it continue to cook until the vegetables have reached your desired level of done-ness.  Depending on how well the lid of your slow cooker seals and how submerged the vegetables are, this could take anywhere from 10-30 minutes.  When they’re done, stir, serve, and enjoy!  Leftovers should keep well in the fridge for several days at least, and leftover curry paste will last a day or two.

*If you don’t have a food processor, you can do this in a mortar and pestle.  Just chop everything as finely as you can first, and be prepared to put some muscle into it!

I’ve got such a backlog of posts for you, from some thoughts on Jamie Oliver’s Chicken Caesar Salad (it’s delicious!) to a quite tasty red pepper pasta dish I made up the other night, so let’s dive right in!

Part I: Jamie Oliver’s Chicken Caesar Salad

Let me start by saying that I don’t like Caesar salad.  But this was delicious!  The homemade croutons are easily the best part, but everything just works so well together, and the dressing is lemony and fresh as opposed to being heavy and gross like most salad dressings.  I did make a few changes (mostly out of necessity) when I made it though.  First, instead of using chicken legs or thighs, I had to use chicken breast because I couldn’t find any legs that weren’t attached to a whole chicken.  (And as the only carnivore in the house, I really have no use for a whole chicken).  But legs would definitely be better because they don’t dry out the way breasts are sometimes prone to.  I substituted prosciutto for the pancetta that the recipe calls for since I can’t for the life of me find a store that sells pancetta, but the prosciutto worked fine and added a nice salty flavor.  I also added asparagus (just tossed it in with the chicken and croutons when I added the prosciutto) and I think that you should all definitely add asparagus if you happen to be making this salad in the springtime!

Yum!

Part II: Red Pepper Pasta

This meal came out of one of those “I’m starving but I don’t want to go to the store and surely we have enough food around here to throw together a pasta dish” type of days.  And sure enough, we did have enough ingredients and this actually turned out to be one of my best experiments.

Ingredients

The inspiration was the jar of red and yellow peppers I found in my cupboard.  I don’t remember why I bought them in the first place–probably I had seen some recipe that I had wanted to try but subsequently forgot about–but they really turned out to be the star of the dish.  I also had a few stray mushrooms left over from the pea shoot recipe, half a red onion left over from something or another, two lonely cloves of garlic, and a bit of fresh rosemary left over from the chicken Caesar salad.

So of course, these ingredients say to me: stir fry!

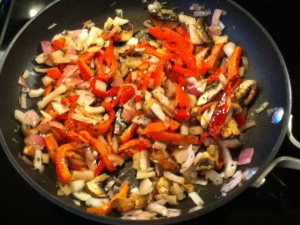
Stir fry!

I put the mushrooms, onions, and rosemary in first, along with a dried chili pepper, since they take a little longer to cook.  Then I added the red peppers and garlic, salt and pepper, and finally stirred in the pasta:

Red Pepper Pasta

The roasted red peppers from the jar add a really nice sweetness to this dish, while the dried red chili adds just a hint of a kick.  Top it off with a little Parmesan cheese and you’ve got yourself a quick and easy meal!

Red Pepper Pasta
(serves 2) 

  • 1-2 roasted red peppers (from a jar, or you can roast them yourself), sliced into matchsticks
  • 3-4 crimini mushrooms, sliced
  • 1/2 red onion, diced
  • 2 cloves of garlic
  • 1 dried red chili pepper
  • leaves from 2 stalks of fresh rosemary, finely chopped
  • olive oil
  • 110g pasta of your choice
  • salt and pepper to taste
  • Parmesan cheese

Start a pot of water boiling on the stove for the pasta.  Meanwhile, chop all of your ingredients except the red chili pepper.  Put a good splash of olive oil in a skillet over medium heat and add the mushrooms, onion, chili pepper, and rosemary.  Stir or toss occasionally until the mushrooms start to brown.  Then add in the red peppers and garlic, taste, and add salt and pepper as needed.  Once the pasta is done, drain it and it to the skillet.  Once everything is mixed, taste again and adjust seasonings if necessary.  Serve topped with freshly grated Parmesan cheese.

The other day I decided I wanted to make a variation on one of the first recipes I ever invented for myself.  Several years ago, when I was living in Armenia, I would go almost every day to the street vendor around the corner to buy fresh fruits and vegetables.  In the spring, when the boxes of produce started to be full of things other than apples and potatoes, the first yellow squash started to appear, along with green garlic (which is milder than mature garlic without losing the rich, garlicky flavor).  For the next couple of weeks, I started making variations on the theme of stir fried squash, green garlic, and cheese, throwing in whatever other vegetables happened to look good that day.  Since it’s spring again now (well, technically summer but you’d hardly know it by the weather!), I wanted to revisit this dish and see if I could recreate it.

Because of the cold spring, I haven’t seen any summer squash anywhere yet, so I bought (Mexican) zucchini, since zucchini and yellow summer squash usually have a fairly similar texture and flavor.  I also did manage to find some young garlic which, while it wasn’t quite green garlic, at least it wasn’t sprouting yet.  And then I came across these.

Bunapi shimeji, also known as white beech mushrooms, are a Japanese variety of mushroom that are extraordinarily cute and while raw, rather impressively stinky.  According to the Wiki article linked above, you shouldn’t eat them raw, and I can’t honestly see why anyone would.  Cooked, however, they lose the stink and become quite pleasantly flavored mushrooms.

Japanese white beech mushrooms

Cooking this dish is straightforward–it’s a one pan stir fry, so after chopping all the zucchini, mushrooms, and garlic, I just dropped them in the skillet with some olive oil, salt, pepper, and oregano and fried them up.  After several minutes, I put the cover on and turned down the heat just to get the zucchini a little softer.  Meanwhile I cut up some brie, and once the veggies were done, I tossed them in a bowl with the brie, stirring until it melted.  And that’s it.


Done!

I do have a few modifications that, in retrospect, would have made this dish even better.  First, if your zucchini are really juicy like mine were, scrape out the center section where the seeds are.  If the zucchini are too juicy, they water down all the other flavors.  Second, if your garlic is young and not too strong, just throw it in raw at the end–otherwise you’ll barely taste it.  And third, adding something crunchy such as raw veggies or croutons, or some nice, crispy bacon would really take this dish to the next level–just experiment to see what you like best.  Putting it on toast would also work well.  And now without further ado, the recipe:

Zucchini Mushroom Stir Fry

  • 2 mid-sized zucchini or 1-2 summer squash, quartered and diced (seeds removed if juicy)
  • 1 package white beech mushrooms (or substitute whatever other mushrooms you like)
  • 5-6 cloves of young garlic
  • brie or other soft cheese (as much or as little as you want)
  • a few tablespoons of olive oil
  • dried oregano (to taste)
  • salt and pepper (to taste)
Optional:
  • Toast or crunchy toppings
Dice your zucchini and roughly chop the mushrooms and garlic.  Pour the olive oil in the skillet and put it on the stove on medium heat.  Once it’s warm, add the zucchini, as it will take the longest to cook.  Season with salt, pepper, and oregano.  Once the zucchini just starts to soften, add the mushrooms, and continue to cook for a few more minutes.  Turn down the heat, cover, and let it simmer for another minute, until the zucchini is soft but not mushy.  Taste, and add more salt and pepper if necessary.
Transfer everything from the skillet to a bowl and add the brie.  Mix well until the brie is melted, and serve immediately with toast, croutons, bacon, or raw veggies.  Enjoy!