Tag Archive: stir fry


Did you know it’s possible to make tofu that doesn’t taste like feet?  No?  Neither did I!

But it IS possible.  And the results are delicious!  All you need to do is watch some Good Eats and buy a lime.  (Well, and some other stuff…more on that in a bit.)

You might be asking yourself why, precisely, I was cooking tofu the other day when I was firmly of the opinion that it tastes like feet and that there are far better ways to get protein (nuts, dairy, eggs, or for us non-vegetarians, meat).  Well, the answer is that my vegetarian husband picked up a package of tofu at the grocery store and wanted us to try and make it like some of the “good” restaurant tofu that’s out there.  And tofu *is* actually quite healthy.

Now I will admit that there are varying degrees of tofu awfulness, and that I have, on occasion (usually in Asian restaurants), had tofu that bordered on being edible.  But I had never yet found tofu that I actually wanted to eat (unless I were starving on a desert island somewhere.)  However, I do like a challenge in the kitchen, and I did want to find a way to add more calories/protein to my typical stir fry recipes so that we wouldn’t negate the healthiness of all the vegetables by gorging ourselves on gelato afterwards.  So I needed some help.  I turned to Alton Brown, who is pretty much always the best source of information on how to cook an unfamiliar ingredient.  Or a familiar one for that matter.

I remembered having watched the tofu episode of Good Eats, and since we never delete Good Eats off the dvr, it was a simple matter of endless scrolling to find it.  What I was looking for was this recipe: thick slices of firm tofu, marinated, battered with egg and fried.  I decided, however, to make my own marinade, since I intended for this tofu to go with Asian-style stir fried vegetables.  While the tofu slices were being squished to remove excess moisture and render them ready to soak up my marinade, I took stock of my pantry options.

Tamari soy sauce of course would be a key ingredient for the marinade.  Mirin and rice vinegar also seemed like good options to get a bit of acidity in there.  Sriracha of course would bring the heat, ginger and lemongrass would add another nice flavor dimension, and then I remembered!  I had a sad, lonely lime sitting in the fridge, left over from making the curry paste.  It was a bit ugly on the outside, having given up its zest to the curry, but the inside was still bright and fresh, and full of juice!  This, in the end, turned out to be the key marinade ingredient, and the main one that I was able to taste in the finished product.

Tofu taking a marinade bath

After the tofu had soaked in its marinade bath for half an hour (15 minutes per side), it was time to fry it.

Now I am notoriously bad at pan frying.  Either my oil isn’t hot enough and things get limp and greasy, or it’s too hot and it smokes, or the things that I’m frying fall apart (looking at you, potato pancakes!), or things get all squished and deformed when I’m trying to flip them…

But this time I was prepared!  With the aid of Alton Brown’s recipe, I was able to create a nice egg batter that stuck to the tofu.  I decided to go with grapeseed oil instead of canola oil for frying because grapeseed oil has a much higher smoke point–thus I would be unlikely to smoke it.  I had spring-loaded tongs at the ready for flipping the tofu, and a thermometer so that I could periodically monitor the oil temperature.

After heating up the oil, I gently placed the egg-battered tofu into the pan.  Instant sizzle – success!  I kept an eye on the temperature and after two minutes, flipped each piece–they were actually golden brown!  After another two minutes I removed them to a cooling rack over a sheet pan to drain.  They smelled good!  I assumed the pleasant smell was just the egg batter, but I was quite pleased that they came out looking like they were supposed to.

Golden fried deliciousness!

Meanwhile it was time to stir fry the vegetables.  I had already chopped them up while the tofu was marinating, and since the burner was still hot, it was a simple matter to grab another (larger) frying pan, add a little oil, and toss the veggies in.

Rainbow!

You might want to tie your lemongrass in a bundle for easy removal. Doing it this way was a mistake.

After the veggies had softened up a bit, it was time to deglaze the pan and get some flavor in there.  I had planned on just using the rest of the marinade to accomplish this, but I overestimated how much was left and underestimated how much I would need to create any sort of sauce.  So I added more tamari, mirin, and rice vinegar, along with a sizable squirt (okay, several sizable squirts) of sriracha, and more grated ginger.  I also added the broccoli and finely sliced Thai chiles at this point, because I didn’t want them to overcook.  I covered it with a lid that is rather too small for the skillet, but it was good enough to collect some steam to cook the broccoli faster.  After a few more minutes, it was done!

The lid is too small!

To assemble the dish, I started with a nice scoop of brown rice (which I had cooked with a bit of tamari and lemongrass, and which, miracle of miracles, did NOT boil over!), and then topped it with a healthy scoop of vegetables, and then put the lovely golden tofu brick on top and spooned a bit of sauce over the whole thing:

Isn't it pretty?

Pretty, aren’t they?

And then it was time to taste it.  I cut off a corner of the tofu, admiring the crispy egg crust, and popped it in my mouth.  And was shocked!  It tasted good!  Not just in an I-can-see-how-this-would-be-good-if-you-liked-this-sort-of-thing way, but in a legitimately I-want-seconds kind of way!  It was delicious!  There was no trace of the soy flavor I typically find so unpleasant.  Just crispy egg batter, a pleasant tang from the lime, and a soft texture somewhat akin to a fluffy quiche.  No longer could I say that I hated tofu.  Hats off to Alton Brown.  His tofu-cooking technique is without equal.

Asian-Style Vegetable Stir Fry with Delicious Tofu
(serves 4)

For the marinade:

  • 2tbsp tamari soy sauce
  • 1tbsp mirin
  • 1tbsp rice vinegar
  • the juice of one lime
  • several squirts of sriracha
  • a pinch of freshly grated ginger
  • 1 stalk lemongrass halved and separated

For the tofu:

  • 1 15oz block extra firm tofu
  • 1/3c all purpose flour
  • 2 large eggs
  • grapeseed oil

For the vegetables:

  • 1-2 tbsp grapeseed oil
  • 2 large carrots, sliced into rounds
  • 1 large or 2 small heads of broccoli
  • 2 watermelon radishes (optional)
  • 1 medium onion, roughly diced
  • 2 cloves of garlic, smashed and minced
  • 7-8 stalks of lemongrass, halved and tied in a bundle
  • 1-inch knob of ginger, grated
  • 2 green Thai chiles, finely minced
  • the leftover marinade
  • additional mirin, rice vinegar, and tamari in equal parts
  • sriracha (to taste)

For the rice:

  • 1c brown rice
  • just over 2c water
  • splash of tamari
  • 1 stalk lemongrass, halved and separated

Drain the liquid from your package of tofu, and then slice it and press the rest of the liquid out as per Alton Brown’s recipe.  A few minutes before it’s done, get out a container with a tight-fitting lid that’s big enough to fit the slices of tofu side by side.  Add in the tamari, mirin, rice vinegar, sriracha, lime juice, ginger and lemongrass and stir until the sriracha is fully dissolved.  Taste it, and add more sriracha.  (Don’t worry–you can add a whole lot and your tofu still won’t be spicy.)  When the tofu is ready, put it in the marinade, cover it up, and set aside for half an hour.  If the tofu isn’t fully submerged, flip it halfway through.

Meanwhile, wash and chop up all your veggies.  Be sure to mince the Thai chiles very finely because they pack some punch!  This is also a good time to get your rice started, since it will take a good half hour (more if you’re using wild rice) to cook.

If you happen to have two good skillets (and two good burners), you can fry the tofu and stir fry the vegetables at the same time.  The vegetables don’t take a whole lot of attention, and the tofu isn’t hard to fry.  But if you want to do them one at a time like I did, start with the tofu.  I followed Alton Brown’s instructions pretty much exactly, right down to the spring-loaded metal tongs.  The only change I made was to use grapeseed oil instead of canola oil.  This is not strictly necessary, but if you do use canola oil, keep a closer eye on the temperature.  Grapeseed oil is good to 420 degrees.  Canola oil varies significantly depending on how it’s processed, but the kind I have is only good to 375-400 degrees.  And I have made it smoke before.  Grapeseed oil seemed safer.  When your tofu is done, remove it to a wire rack over a sheet pan to drain off any excess oil.

For the vegetables, heat a little oil in your skillet and add everything except the broccoli and Thai chiles.  Toss/stir them around occasionally.  Once your vegetables have started to soften, deglaze the pan with the extra marinade plus equal parts additional tamari, mirin, and rice vinegar as well as some sriracha.  You want just enough to create some sauce in the bottom of the pan.  Add in the broccoli and Thai chiles, stir, and then cover to let the broccoli steam.

By the time your vegetables are done, your rice should also be done.  Put some rice on each plate, top with vegetables and a slice of tofu, spoon a bit of sauce from the vegetable skillet over the top, and enjoy!

You guys, I’m so excited!  The husband and I are headed off on our honeymoon tomorrow to Portland, Oregon for 10 days of food nerd awesomeness!  We have both a spreadsheet and a customized google map marking out all the places we want to try–it’s going to be awesome!  (Of course we also have lots of walking and hiking planned…have to do something to burn off all the ridiculous meals we’re going to be eating!  Plus there are awesome waterfalls near Portland!)  I’m planning on tweeting pictures of the food (and anything else cool that we come across!), so if you haven’t followed me on Twitter yet, please do!  Or not if Twitter’s not your thing–don’t worry, I’m planning a round-up blog post about the trip when we get back.

And now on to today’s recipe!  I made this a couple weeks ago but I hadn’t gotten around to actually writing up the post yet.  But this might just be one of my favorite recipes I’ve shared here.  It has just the right balance of flavors…sweet/sour/savory/salty/bitter, with just the right amount of spice.  The key is really the lime juice at the end.  The lime juice takes what would have been a pretty decent dish to a whole other level of flavor.  So don’t leave it out!  Added bonus: this dish is ridiculously healthy, what with the quinoa and the beans and the kale and such.  But it doesn’t *taste* like health food.  It just tastes good.

Colorful, isn't it?

So without further ado:

Quinoa Adzuki Bean Stir Fry

  • 1/2c quinoa (uncooked)
  • 1.25c water
  • 1/2tbsp tamari
  • 2 carrots, sliced into discs
  • 1 daikon, sliced into discs
  • 1 green pepper, sliced into strips
  • 1/2 habanero pepper, minced
  • 1/2 large white onion, diced
  • 1 can adzuki beans, drained (also rinsed if they contain salt)
  • 1 tbsp olive oil
  • splash mirin
  • 1 inch knob ginger, peeled and freshly grated
  • juice of 1 lime
  • 1 bunch lacinta kale, de-stemmed and roughly chopped
  • dash cayenne pepper
  • 1/2c sugar snap peas
  • freshly ground black pepper

Rinse and pick over the quinoa, then put it, the water, and the tamari into a pan over medium-high heat and bring to a boil.  Once it starts to boil, reduce the heat and simmer for about half an hour until all of the water is absorbed.  Keep an eye on it, both so it doesn’t boil over and so it doesn’t overcook.  If it finishes cooking before you’re done with everything else, take it off the heat, fluff it with a fork so it doesn’t stick and then set it aside.

Meanwhile in your largest skillet, heat the tablespoon of olive oil over medium heat.  When it’s hot, add the onion, carrot, daikon, ginger, and black pepper.  Stir periodically.  When the onion starts to get transparent, deglaze the pan with the mirin and add the kale and habanero.  When the kale starts to wilt, add the quinoa, green pepper, and adzuki beans.  Mix well.  When everything is heated through, remove it from the heat and add the sugar snap peas and a splash of tamari.  Pour in the lime juice, give everything a good toss to mix it all together and enjoy!

I’ll admit it–I’ve been procrastinating on writing this post.  Why?  Because of the two people who tried this dish (me and my fiance) only one of us (me) liked it.  50% success rating?  Not very good.

But I liked it!  So I’ve decided to post it anyways.  Feel free to try it out, make your own tweaks, and tell me what you think.

squash

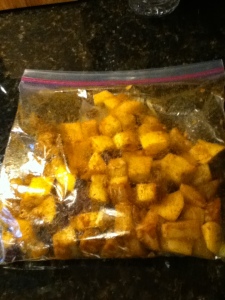
Yellow summer squash has a pretty delicate flavor, which makes it a good canvas for mixing with other, stronger flavors.  I decided I wanted to try marinating it in a mix of spices, so I pulled out all the spices I thought would work well together, measured them into a bowl (amounts based on how it smelled), and then I chopped the squash into 1 inch(ish) cubes, tossed them in a ziploc bag, poured in just enough olive oil to coat them, and then added the spice mix.  I sealed up the bag and tossed it around until all of the squash was well coated in spices and then I left it to sit while I got everything else ready.

Spice Mix

Marinating Squash


I put a pot of water on the stove to boil for making buckwheat, which I thought would make a good base for the spiced squash.  You could also use rice, quinoa, couscous, or any other grain you wanted.  Once that got going, I chopped up some baby red onions, and put my largest skillet on the stove to heat up.

Once the skillet was good and hot (check this by dripping some water on it–if it sizzles and evaporates right away, it’s ready), I dropped in the squash.  To get a bit of a flavor contrast with the savory spices of the squash, I also added about a third of a cup of dried sour cherries.  You could use any dried fruit, really, depending on what you’re going for, but I found that I really liked the sourness the cherries brought to this dish.

After half a minute or so, I added in some white wine,  because I had a bottle that was almost empty and it seemed like a good idea!  It turned out to be an excellent idea except that I only had about a quarter cup left.  If I were making this recipe again I would definitely use at least half a cup if not a bit more so that the wine flavor really gets in there.  The cherries and the wine really pair well together.

Simmering

I let everything simmer down for several minutes, and then I added the onions and covered it so that the squash would cook through faster.  (The buckwheat was almost done!)  After simmering for about 20 minutes, the squash was tender and it was time to serve it up!  I put a scoop of buckwheat on each plate, put a good-sized scoop of squash on top, plus a bit of the juice from the bottom of the pan.  And that’s it!

Spiced Yellow Squash

Spiced Yellow Squash
(serves 3-4)

  • 2 medium yellow squash, chopped into ~1″ cubes
  • 1/3c dried sour cherries 
  • 2-3 baby red onions or shallots, chopped
  • 1/2c white wine
  • olive oil
  • 1tsp ground coriander
  • 1/2tsp cinnamon
  • 1/2tsp smoked paprika
  • 1tsp cumin
  • 1/8tsp cayenne pepper
  • 1/4tsp ground ginger
  • 1/8tsp black pepper
  • 1c buckwheat or other grain
First, measure out your spices into a bowl and mix them together.  Feel free to vary the amounts–it has a pretty good kick the way I made it.  Chop your squash into approximately 1 inch cubes, then toss it in a ziploc bag with some olive oil and the spices.  Make sure it’s fully coated with the spices, and then leave it to marinate for a bit.
Put the water on to boil for the buckwheat/rice/whatever, and make it according to package instructions.  Meanwhile, chop the onions, and put a large skillet on medium heat.  When the skillet is hot, add the squash and the cherries.  Let it sizzle for half a minute to a minute, and then add the white wine.  When it starts to reduce, add the onions and cover so that the squash cooks through.  (If you don’t have a cover for your skillet, use aluminum foil).  When the squash is tender, serve on top of a scoop of buckwheat.
My fiance wanted the dish to be sweeter.  If you agree, feel free to add a few handfuls of golden raisins at the same time you add the cherries.  Personally I like it better without, but to each their own!

The other day I decided I wanted to make a variation on one of the first recipes I ever invented for myself.  Several years ago, when I was living in Armenia, I would go almost every day to the street vendor around the corner to buy fresh fruits and vegetables.  In the spring, when the boxes of produce started to be full of things other than apples and potatoes, the first yellow squash started to appear, along with green garlic (which is milder than mature garlic without losing the rich, garlicky flavor).  For the next couple of weeks, I started making variations on the theme of stir fried squash, green garlic, and cheese, throwing in whatever other vegetables happened to look good that day.  Since it’s spring again now (well, technically summer but you’d hardly know it by the weather!), I wanted to revisit this dish and see if I could recreate it.

Because of the cold spring, I haven’t seen any summer squash anywhere yet, so I bought (Mexican) zucchini, since zucchini and yellow summer squash usually have a fairly similar texture and flavor.  I also did manage to find some young garlic which, while it wasn’t quite green garlic, at least it wasn’t sprouting yet.  And then I came across these.

Bunapi shimeji, also known as white beech mushrooms, are a Japanese variety of mushroom that are extraordinarily cute and while raw, rather impressively stinky.  According to the Wiki article linked above, you shouldn’t eat them raw, and I can’t honestly see why anyone would.  Cooked, however, they lose the stink and become quite pleasantly flavored mushrooms.

Japanese white beech mushrooms

Cooking this dish is straightforward–it’s a one pan stir fry, so after chopping all the zucchini, mushrooms, and garlic, I just dropped them in the skillet with some olive oil, salt, pepper, and oregano and fried them up.  After several minutes, I put the cover on and turned down the heat just to get the zucchini a little softer.  Meanwhile I cut up some brie, and once the veggies were done, I tossed them in a bowl with the brie, stirring until it melted.  And that’s it.


Done!

I do have a few modifications that, in retrospect, would have made this dish even better.  First, if your zucchini are really juicy like mine were, scrape out the center section where the seeds are.  If the zucchini are too juicy, they water down all the other flavors.  Second, if your garlic is young and not too strong, just throw it in raw at the end–otherwise you’ll barely taste it.  And third, adding something crunchy such as raw veggies or croutons, or some nice, crispy bacon would really take this dish to the next level–just experiment to see what you like best.  Putting it on toast would also work well.  And now without further ado, the recipe:

Zucchini Mushroom Stir Fry

  • 2 mid-sized zucchini or 1-2 summer squash, quartered and diced (seeds removed if juicy)
  • 1 package white beech mushrooms (or substitute whatever other mushrooms you like)
  • 5-6 cloves of young garlic
  • brie or other soft cheese (as much or as little as you want)
  • a few tablespoons of olive oil
  • dried oregano (to taste)
  • salt and pepper (to taste)
Optional:
  • Toast or crunchy toppings
Dice your zucchini and roughly chop the mushrooms and garlic.  Pour the olive oil in the skillet and put it on the stove on medium heat.  Once it’s warm, add the zucchini, as it will take the longest to cook.  Season with salt, pepper, and oregano.  Once the zucchini just starts to soften, add the mushrooms, and continue to cook for a few more minutes.  Turn down the heat, cover, and let it simmer for another minute, until the zucchini is soft but not mushy.  Taste, and add more salt and pepper if necessary.
Transfer everything from the skillet to a bowl and add the brie.  Mix well until the brie is melted, and serve immediately with toast, croutons, bacon, or raw veggies.  Enjoy!

There comes a point, about a week and a half after grocery shopping, when you realize oh no!  You bought way too much produce and it’s starting to go bad!  No?  Maybe it’s only me…

When I find myself in such a situation, I have two go-to options: veggie omelette* or stir fry. But since I didn’t have any eggs, stir fry it was!

A random assortmentI had a random assortment of veggies on hand–half a red pepper, half an onion, a beet (the last of the beets!), and some broccoli. This to me says Thai food. (Well, except the beet. But I needed to use it up.) But, of course, this being clean out the fridge day, I didn’t have all the ingredients to make any sort of authentic Thai food. So I decided to just go with whatever seemed like it would taste good–veggies, spices, and long noodles.

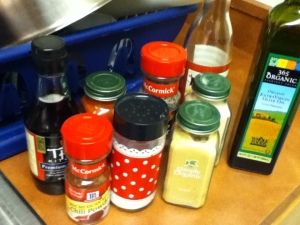
When I’m making up a stir fry with a lot of spices, I always like to get them out ahead of time so that I don’t forget any potentially good ones. I pulled out ground ginger, garlic powder, chili powder, salt, black pepper, paprika, rice vinegar, fish sauce, and olive oil, figuring that I’d decide as I went along which ones I would actually use.  I ended up not bothering with the paprika or garlic powder, or the vinegar (but more on that later.

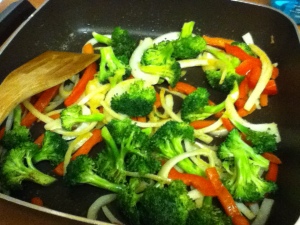
Now most people use some sort of large frying pan or wok for making stir fry.  This has some definite advantages, particularly the fact that it would be infinitely easier to clean something that you can actually put in the sink.  But I haven’t gotten around to buying one and I’m still cooking with my post-college collection of random cookware.  Thus my stir fry was made in this:

It's electric!

My trusty electric griddle!

The biggest advantage of cooking in this is that it heats up instantaneously.  Makes for speedier cooking!

Veggies!Once I had everything out and chopped, and water boiling on the stove for noodles, I put a couple glugs of olive oil in the griddle, turned it on, and let it heat up for a few seconds before tossing in the pepper, onion, and broccoli.  After stirring things around a bit and getting a nice sizzle going it was time to start adding spices.  I started off with the ginger, because I knew I was aiming for a gingery taste in the end.  I had to put in a lot.  If you’re making this at home, do it with fresh ginger if you can–the flavor will be much stronger!  Then I added a little bit of salt (though not much because I was planning on adding fish sauce later and fish sauce is salty!), some black pepper, and some chili powder, mixed everything around a bit more and tasted it.  More chili powder and ginger!  I really wanted this to have a kick to it.  Once the broccoli was bright green and the peppers and onions were softening, I turned the heat almost all the way down just to keep it warm.  You don’t want to overcook the vegetables!

Once the pasta was done, I drained it, and dumped it in with the vegetables.  The pasta I used came from Trader Joe’s and was a spinach and chive linguine.  But really you could use whatever you want.  I do like linguine for this type of stir fry though.  I turned up the heat a bit, and after giving everything a good stir, I decided it was time to add some sauce.

Now, I had no real plan for making this sauce.   I vaguely intended to do something with fish sauce and vinegar.  But I didn’t want to ruin the veggies.  So I put a forkful into another bowl, dripped some fish sauce on it and tasted it.  Wow is fish sauce ever fishy when there’s not a lot of other flavors mixed with it!  (Yes, I know, this should have been obvious.)  A little grossed out, I decided to add the vinegar to see what that would do to the flavor.  So I added a few drops of vinegar to what was left in the bowl.  Bad idea.  Terrible idea, in fact.  The vinegar idea was thus quickly vetoed.   I decided, however, that a few drops of fish sauce in the entire stir fry wouldn’t be too overpowering, so I put some in.  You could easily substitute soy sauce instead to make this vegetarian.  And honestly?  After the fishy smell/taste overload of the test bite…I might do that next time too.

At this point you might be wondering what happened to the beet.  Or you might have forgotten about it like I did.  Granted I didn’t intend to put it in til the end anyways since all it needed to do was warm up, but I totally forgot about it until I was about to plate my food.  But I tossed it in, turned up the heat again, stirred everything around, and then tasted it.  I added a little more ginger, gave it one last good stir, turned off the heat, and plated up my food!

Done!

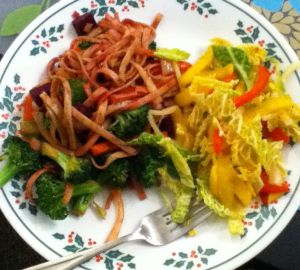
On the plate!

On the left: Stir fry. On the right: Mango slaw (minus the cashews and mint) from Smitten Kitchen**


*Actually it very rarely turns into an omelette as I don’t have an appropriately sized frying pan.  Usually it’s more like scrambled eggs with vegetables.

**Smitten Kitchen’s mango slaw recipe.