Archive for April, 2013


Sweet potatoes!

I spoke too soon in my last post–it seems spring is still not here.  I woke up to see snow on the ground and to hear little ice pellets clattering against the window.  Since it’s a good day to stay indoors and sit by the fire, I have a hearty, wintertime recipe to share with you.

Until I made these beauties the other day, I had never made twice-baked sweet potatoes before.  In fact, I had never made any kind of twice-baked potato before.  Where had they been all my life??

Twice-baked sweet potatoes are, in fact, surprisingly easy to make, requiring very little effort and only a minimal amount of pre-planning (you’ll need about an hour and a half to make them, but only about 10-15 minutes of that time will be spent actually doing anything.  The oven takes care of the rest!)

The recipe below is really more of a template–there are an infinite number of ways in which you could season your potatoes; I just pulled out a bunch of different spices that I thought would play well together and added them in, a bit at a time, til I had a flavor I was satisfied with.  I ended up using a combination of Chinese five-spice, cayenne pepper, cumin, coriander, smoked paprika, cinnamon, and curry powder.  The curry powder was a last minute addition, because it still wasn’t tasting quite right–had I thought of it sooner I probably could have eliminated the extra cumin, coriander, and cinnamon.  Other spices that would work as well include ginger, cloves, nutmeg, and allspice.  Or you could try adding a splash of maple syrup with some cayenne…there are a ton of different possibilities.  The key is to add a little at a time, mix well, and taste.  I ended up tasting the mix five or six times before I was satisfied.

Twice-Baked Sweet Potatoes
(serves 2)

  • 2 medium sweet potatoes
  • 3 oz soft goat cheese
  • a pinch of raw cane sugar
  • salt and pepper
  • spices to taste (e.g. curry powder, five-spice, cayenne pepper, smoked paprika, cumin, coriander, ginger, etc)

Preheat the oven to 375 degrees.

Thoroughly scrub the sweet potatoes, and poke them all over with a fork.  Put them in the oven, directly onto the middle rack, and put a baking sheet on the rack below to catch any drips.  Bake for about an hour.

When the sweet potatoes are done baking, take them out of the oven, and cut a slit along the top of each potato, lengthwise.  Gently push on the ends of each potato to open it up, and scoop the insides into a bowl with the goat cheese.  Be careful not to tear the skins.  Mix up the sweet potato flesh and goat cheese until fully incorporated.  Then add the sugar, and the spices of your choice, a bit at a time.  Add a pinch of salt and a few grinds of pepper, and mix thoroughly, tasting periodically as you adjust the spicing.

When you like the flavor, gently spoon the filling back into the sweet potato skins, put them on the baking sheet, and return them to the oven to bake for another 10 minutes or so until warmed through and slightly browned on top.  Enjoy!

Spring has sprung!

Spring is late this year–there’s even still some snow on the ground in the shady areas. (That’s the last time I ever trust a groundhog to predict the weather!)  But a few glimmers of hope are finally starting to shine through.  Tulips are trying to come up, birds are building a nest out on our balcony, and asparagus that was not grown in Mexico has reappeared in the grocery store.

I bought some, not quite sure what I intended to do with it, but I knew that I wanted to leave it raw or nearly so.  Further inspiration struck in the form of a lovely brick of cheese at Trader Joe’s – it was a mix of cheddar and gruyere: a perfect combination of flavor and melt-ability!

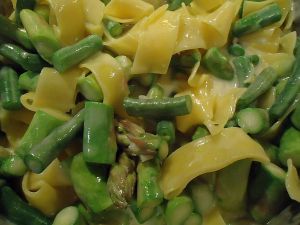
I decided to make a pasta dish with a basic white sauce as its base that would really show off the freshness of the asparagus.  At the last minute, I also decided to throw in a handful of fresh green beans, but you could totally use frozen as long as you thawed them out first. Peas would be another excellent and springlike addition.  Just go with whatever looks good!

The key for the asparagus, though, is tossing it in to the sauce at the end, just before you add the pasta–you want it to heat through, but you don’t want it to lose any of its delightful, crisp freshness.  So don’t overcook it!

Ready to eat!

Springtime Asparagus Pasta
(Serves 2-3)

  • 1 bunch asparagus, chopped into 1 inch pieces
  • 1 handful green beans, chopped into 1 inch pieces.  Feel free to use frozen, but thaw them before adding to the dish.
  • 2 cloves garlic, finely minced
  • 2 tbsp butter
  • 2 tbsp all purpose flour
  • 1 c milk
  • 1/2 c grated cheese (I used a cheddar-gruyere blend)
  • 112g pasta (I used papardelle)
  • salt
  • pepper
  • pancetta (optional)

Put a pot of salted water on to boil.  Cook the pasta to al dente and drain.  While the pasta is cooking, melt the butter in a saucepan over medium heat.  Once it’s melted, whisk in the flour.  When the roux is smooth, pour in the milk, whisking steadily to combine.  Add the garlic, and keep whisking until the sauce begins to thicken.  If it starts to bubble, reduce the heat.  Add in the cheese, and once it’s melted, add in the asparagus and green beans.  Toss in the pasta, and mix to combine.  Season with salt and pepper, and, if you like, top it with some crispy pancetta bits.  Enjoy!

Egg Kulambu

Looking for something to do with those leftover hardboiled eggs you have laying around after Easter?  Try this awesome South Indian recipe I stumbled across–it only requires an onion, a tomato, a can of tomato sauce, some garlic, and a variety of pretty standard Indian spices.  It’s called Egg Kulambu, and it filled my kitchen with the most delightful smells as it simmered away on the stove.  I used roughly twice as much tomato sauce as the recipe called for (and reduced the amount of water accordingly) because I didn’t want half a can of tomato sauce sitting around.  I actually like the way it made the sauce a bit thicker.  This dish would be excellent served over rice or with some naan, although I actually ended up eating it like soup with some toast on the side.

Be forewarned – this dish does pack a powerful punch, so if you’re sensitive to spicy foods, you may want to cut back on the cayenne a bit. But if you, like me, have been searching for a South Indian recipe that doesn’t hold back on the spices, go for it!

But you may want to have a glass of milk handy, just in case.

That's cilantro on top.  Fresh would be better if you have it...

Egg Kulambu by Alamelu Vairavan

P.S. A note about hard boiling eggs: I usually use this method from Simply Recipes, and I’ve never overcooked my eggs with it.  But I still spend the whole time standing over the pot, worrying if they’re going to come out right.  If anyone has any foolproof tips, leave them in the comments!

Saying that this dish did not turn out right the first time would be an understatement.  I’ve made plenty of dishes over the years that haven’t turned out quite like I had envisioned or that could use some tweaking here or there.  My first attempt at this one though?  Was nearly inedible.  My husband bravely finished his bowl and told me it wasn’t that bad, but really?  It was that bad.

So why am I sharing a recipe with you that I fully admit started off as inedible?  Because I ended up making it again the other night, with some MAJOR modifications and it turned out to be a pretty tasty dish!

The problem with the original version and thus the key to making the new version tasty?  Garlic.

When I pureed the pesto in the blender the first time around, I added in raw garlic (not a lot, I swear!) thinking that it would be a good punch of garlicky flavor (and be mellowed out by the cheese, broccoli, etc).  Well, this might have worked if it had been green garlic, or even early summer garlic.  But late winter garlic?  Not so much.  One of my friends coined the term “death garlic” and that pretty much sums it up.  It completely overpowered everything else in the dish and filled your tongue with a noxious, garlicky burning sensation.

The solution?  Roasting.

mmm...garlicky!

For the new version of this dish, I set half a head of garlic on a piece of aluminum foil, drizzled it with olive oil, sealed it up, and roasted it at 350 degrees for 35 minutes.  Problem solved!  The smell of roasted garlic is absolutely amazing, and it mellows out the flavor to the point where you almost want to just sit there eating it with a fork.  Plus roasting makes the cloves pop right out of the papery skins!

I made a few other changes to the original recipe as well.  This time I made the pesto in the food processor instead of the blender (it made drizzling in the olive oil much easier), I added Parmesan cheese to the pesto instead of the goat cheese I used in the original version (kept the pesto thinner), and because I had them, I sauteed some mushrooms and shallots and tossed them in with the broccoli.  The mushrooms turned out to make a big difference–they added a texture and savory depth that was missing from the first version of the dish.

Pesto at the end of the tunnel


mushrooms!


So much pesto...

One note on the type of pasta: I used whole wheat fusilli noodles (corkscrew shaped), which worked out really well because this is a rather thick pesto.  There are plenty of other shapes that would work too–I’d just recommend staying away from long and/or flat pastas like papardelle or fettuccini.  They won’t work nearly as well.

In the end, the new version of this dish was MUCH tastier than the original, still not very difficult to make, and something that’s definitely worth adding to your pasta and pesto repertoire.

Ready for eating!

Broccoli Pesto Pasta
(serves 2-3)

  • 1/2 head of garlic, outer layers of skin removed
  • 3 medium crowns of broccoli, long stems are a bonus
  • 1 cup of mushrooms, sliced
  • 2 shallots, diced
  • 1/3 cup freshly grated Parmesan cheese
  • olive oil
  • 112g whole wheat pasta
  • salt
  • pepper
  • lemon juice (optional)

Preheat your oven to 350 degrees.  Remove the outer layers of papery skin from the head of garlic.  You only need half the cloves for this recipe, but feel free to roast the whole head of garlic if you have another use for it.  Set the garlic on a piece of aluminum foil and drizzle it thoroughly with olive oil.  Seal it up, put it on a cookie sheet, and roast for 35 minutes.

Meanwhile, bring a pot of well salted water to a boil.  When it’s boiling, dip the crowns of broccoli in, one at a time, for 30 seconds each.  (This is why the long stems are helpful–they give you something to hold on to.  If your broccoli doesn’t have a long stem, just drop it in and fish it out with a slotted spoon after 30 seconds).  As soon as you take the broccoli out of the boiling water, run it under cold water for a bit to stop the cooking.

Roughly chop two of the three crowns of broccoli and put them in the food processor.  Grate in about 1/3 cup of Parmesan cheese (more or less as you desire), and add a few grinds of black pepper.  Take your garlic out of the oven, carefully open up the foil pack, and remove the cloves of garlic from their skins and add them to the food processor.  Pulse several times, scrape down the sides, and then let it run as you drizzle in olive oil.  You want enough olive oil to thin it out into a sauce-like consistency rather than a paste, but not so much that it tastes oily.  Stop and taste it periodically until you get the consistency you prefer.  Salt to taste.

Once the pesto is done, add the pasta to the pot of (still boiling!) water that you cooked the broccoli in.  While that’s cooking, heat a bit of olive oil in a medium sized skillet and add the shallots and mushrooms.  Cook for a few minutes until the mushrooms are nice and brown.  Chop the remaining broccoli into bite sized florets and add it to the skillet.  Drain the pasta, and then add both it and the pesto to the skillet and toss everything together.  Once everything is well coated in pesto, take it off the heat and serve garnished with a bit more freshly grated Parmesan and/or a squeeze of lemon juice.  Enjoy!